Monday, 20 February 2017

Art Nouveau

Art Nouveau = New Art in French

It is a style that is based on stylised plant forms and it is really very decorative.

The Art story website has some information on it that it would be useful to look at, as does artsy.net

In completing your Art nouveau research page it should have the following:


  • Some drawing of Art Nouveau (does not have to be a complete pattern, but should be very detailed in what you do present and good quality)
  • another drawing of a new leaf/plant form on the other side of the page
  • 6 - 8 facts about Art nouveau that you peer check (try to stick to the sites I have given you)
  • Colour used appropriately
  • No off-task drawings on your work or in your books
There is this particular form that is the building block of Art Nouveau - It is called a 'whiplash'.

Make sure you identify this form in your Art nouveau drawing and can recognise it easily.

I will be MARKING these two sheets of research specifically for feedback for your first set of reports. 


Wednesday, 15 February 2017

Year 11 in 2017

What we are doing:

You need to start with your concept; by now you all should have 3 words added to the google tracking sheet we have shared with you. Those three words should help express a direction for the meaning behind your work.

You should all have a couple of Artist models that your teacher has directed you to look at. Many of you will have started some drawing around this too.

You should all know where the research document is located on the google site and be working through it with one image from one artist.

If that is getting hard and confusing consider first - if you do this three or four times with a compare contrast at the end of they year, we can in fact make sure it counts for research credits (1.1) with a few tweaks. Second - I will upload an exemplar of what it could look like so that you are a little less confused.


Tuesday, 14 February 2017

What used to be 9 is now 10

Welcome to Year 10 Art! How exciting. You are finally there.

Year 10 Art is cool because you get to be here all year. You have also chosen this space and time so you are all in the same position. It's a choice you have made to be here and that makes it different.

where we are starting:

If you go to the google site for visual arts (you know where that is) you should be able to navigate your way to Year 10. There is a course outline there and links to each term for our outline of work.

Term one is quite broad - it's about good drawing and composition basics. Learning that you can experiment with the media to learn and also develop new, techniques.

If you are in my class you know those two words:

Media and Techniques


We talked these through: Media - what it is made of, techniques - how the media is used to make it. 


In case you missed it, I took a photo of my terribly messy notes for the blog post you should all have to accompany your charcoal techniques page. 

Monday, 13 February 2017

Year 9 research page on Kowhaiwhai and Stylisation

Noticing stylisation around us:

So last lesson, we talked about stylisation and what that could mean in music as a way of trying to illustrate it.

From now, we need to see it from a visual perspective.

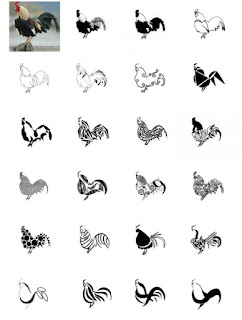
Below are some visuals that show stylisation happening to a visual form:


This is an example of stylisation of a rooster by a graphic designer called Maria Muzaffar. She is a graphic designer and was working towards developing a logo for a company.

With Kowhaiwhai, these forms came from a plant form.


Your task:


  • Kowhaiwhai and observation of a leaf form should be complete on the one page
  • 6 - 8 facts on kowhaiwhai should be on that page - peer check that these are accurate, I will check them over too. (use reputable, reliable sources of information) 
  • Use your chrome book or phone to photograph this page and upload it on your blog. Explain what the page is and use 'labels'. Check with me or google if you are not sure what this means.
Michelle A in 9 TN February 2017.


Sunday, 4 December 2016

Painting with Watercolours

Water colours are watery. Not thick like acrylic or oil paint.

Traditionally you can see the paper through the paint and the paper tone makes your white tones.

 click here for the Pinterest page on water colour painting techniques

- Practice on spare bits of paper
- Use contrasting colour matches for shading/shadows and modelling things to look 3 dimensional.

 
Red/Green
Blue/Orange
Yellow/Purple

Black is really harsh. using it as a shadow colour can be overwhelming. Do so with subtlety. 

If you have not planned how to use the negative space - this means you are not actually achieving. the whole point was to 'compose' how you were using the space, not to just place everything in the centre. 

I should be able to see your compositional sketches from which your idea comes from as I move around the room. 

Friday, 2 December 2016

What you may have missed...

For those of you who missed the last one or two lessons:

Whatever point you are at, we are taking your 'logo' of your initials or image and developing it into a stencil. This stencil (if you are lucky and responsible) will be applied to our 'wall' with spray paint. To do this you have to show you can be trusted.

What is a stencil? How do you make your image into one

- Holds together as one piece - Template and Stencil.

The template blocks the paint from hitting the negative space of the image and the stencil (open) allows the paint to go where you want positive space.


If you are turning an image into a stencil, you need a strong material to use as a template.

You also need to design it to hold together so that your details are apparent.

If i was making a stencil of a letter 'P' - there is a hole in the middle. Do you remember those alphabet stencil templates you used to get as kids?
 How do you make it show all the detail in the middle and hold together? you make those breaks happen in the positive space so that the template remains ONE PIECE.

Here are some of the examples I went over on the board during classes this last week:


Here are some student's work that got finished last week:

We have a wall on the side of the unused kiln room which is for stencils ONLY.

Kody 8gb Stencil and Template both could be used because he was so neat with his cutting
Nathan 7Bk - original design
Nathan 7 Bk - reworking to be a template and stencil
Jaedon 8gb finished painting
Kody, Jaedon 8gb, Shikobi 7bk finished paintings

Sunday, 13 November 2016

Work for Monday - start with the form, no longer than five minutes please - it is easy

Hello class, today I was not planning to be away. Never mind

I suspect there will be half a dozen of you who cannot 'fond' your google drawing file from last time - open your google drive and go to 'recent' is probably the easiest way to find it. It WILL be there.


When you have finished this form, your teacher will go through the instructions for the lesson. Listen and pay attention, I have expectations for Wednesday!

Learning outcome:
The role of the artist in telling a story (using narrative approach)

Should already have:
- Your brainstorm branch at the top of a page
-Your google draw file open in front of you - FINISHED - 6 images relevant to your brainstorm on it.

Tasks: - we are designing a series of ideas for a painting based on the narrative. 
Must do:

  • The form above and getting your thumbnails sketches out.
  • Observational drawing from one or two of your google images that you have collected
  • Plan at least three ideas where you show you are thinking about 'story' or 'narrative'
Could do:
  • Make a clear effort to use Manga styles in your work (eyes, comic layout, speech bubbles etc)
  • Make a clear effort to use Pasifika patterns in your work
By the end of the lesson:
  • Google form is done, I will bug you if it isn't
  • Google drawing with research images (photographic ones) are sorted
  • Thumbnail sketches page has brainstorm branch on it, observational drawing on it and thumbnail sketches that could become your final painting on it. 

Good luck.

Please share your work on your school blog if you like so I can see. I will show you how to use it properly on Wednesday if no one else has yet.


Tuesday, 8 November 2016

Thumbnail Sketches

Are quick sketches where you consider how to create your composition.

Your composition should be reflecting your concept, otherwise there is not much point! Who writes a song about love and never talks about it?

You should all have an A3 page, titled "Thumbnail Sketches". Makes it easier to find next time...

On it, that branch of your brain storm that defines your concept. Up the top, not dominating too much space would be good.

A logical next step is to make sure you have some imagery that is relevant to your concept, keeping in mind Pasifika and Manga should be clearly present.

For me: - Minnie's heels, bow, etc... maybe some images of Jimmy Choo shoes as well. It would be sensible for me to use google image to collect these, as it is accessible. That doesn't mean I google art work about Minnie and Mickey and gender roles. It means I start my own source imagery collection.

Collecting these images up and making them into a google draw resource is where I will take this next... (today's task)

How to use google draw:


1) Watch the video
2) Set up your own google draw for term four narrative painting
3) Google search images based on your concept using 'search tools' - 'usage rights' - labelled for re-use


Collect at least 6 images you can draw from later on.

More instructions to come...

Defining your narrative

If you missed this lesson, we watched this as a starter.

what did we learn about why Feu'u makes his work?
- culture
- life
- death
- experiences
- meaning

Everything had a meaning or a reason behind it.

The task was to create a brainstorm on a topic of your own choosing. Absolutely anything. At least 5 words should have branched off your main brainstorm word:

 this is my example one on the board on Mickey Mouse. Five things that instantly came to mind.

Choose at least one of these things to extend your ideas:

 I chose 'Minnie' and then from there it was 'heels', 'female', and 'cutesy' that came to mind.

If I was using this as an overall concept, it is the male and female roles Disney portrays. Everyone should have been to this point by the end of the lesson. Everyone will have a different concept.


Composition

Last week we covered some compositional elements of both Manga and Fatu Feu'u.

If you missed this lesson, or need to recap, we looked at Pacific Conference 2007 By Feu'u


Pacific Conference:
Bleach Manga & TV Photo: Some of my fav pages

The things you were asked to notice/do were:


  • Completing a quick 'thumbnail sketch' of each piece (rough, proportional, but not detailed)
  • Defining the difference between realistic, abstract, symbolic, surreal in classifying these art works.
  • Identifying the background, middle ground and foreground use of space - can you see how this is visually balanced?
  • Understanding the narrative value of each piece with 4 bullet points that illustrated this on your page
Both Art forms are "Narrative' in style - they have a story.


This work should have covered an A3 page.

Wednesday, 2 November 2016

Posting a decent blog post

Today in 8GB and 7 BK we worked on reforming our blog posts using a bit of structure.

Here is how it goes:

1) Open up your Google Draw on Street art and make sure it is downloaded as...JPEG.
2) Open up www.blogger.com and make sure you can see your school blog - is should read [your name] @ Hornby High School. If you cannot see that, email me and I will let admin know.
3) Make a new post (or edit the one you already made).

4) Use this template to make sure you are writing a blog post with some quality.
1) Your Learning Outcome is:
The role of the Artist as an antagonist - Year 8
The role of the Artist in disrupting what is 'accepted' - Year 7

In Year 8 you need to show you understand that word Antagonist. It would be useful if you understand the word Protagonist too, as it is the opposite role. You can use google to do this bit, but put it your own words.

2) Learning process - describe what you did to make your JPEG. As little or as much detail as you want here.

3) Evidence - You have already done this - it is your JPEG. You need to upload it to your blog. Below is a screen shot. See the blue word that says LINK? There is a little landscape image next to it. THAT is the button you use to insert an image. 


4) What worked, what didn't, what to change - this can be a list. NEXT re-state your learning outcome and try and write a sentence that reflects what you think you understand of it now. 

This is homework for anyone who didn't complete this in class. Due by the time I see you in class next Thursday.

Monday, 24 October 2016

Click here for the full length video documentary on Graffiti Wars; King Robbo Vs Bansksy

Wednesday, 12 October 2016

Street art and stencilling your ideas


We are staring with you developing your own research document on Google Draw.


The things you need on your drawing are:

1) Two attributed images of Banksy's work
2) One piece of work by an Artist called Shepard Fairey - attributed
3) 4 facts about what street art is
5) A youtube link to how to make stencils for spray painting.
6) A title of your own design.

Once your google drawing is complete, you need to share it with me and post it on your blog. to do this, download as... "PDF" or "JPEG" and insert it into a post. Make sure you use a label for Art. I will help you with this bit if it is confusing.